Decrypt Traffic with Mitmproxy & Wireshark
Introduction
In some situations during your career as a security researcher or another area under the cybersecurity umbrella one may need the capability of decrypting application layer traffic such as HTTPS and WebSockets.
To decrypt HTTPS or WebSockets traffic, we can utilize mitmproxy to decrypt SSL/TLS and Wireshark to analyze that traffic. From a security context, we are essentially creating a man-in-the-middle condition locally.
Mitmproxy

mitmproxy is a free and open-source proxy capable of intercepting SSL/TLS for HTTP/1, HTTP/2, and WebSockets. This tool is great in that you can decrypt and modify packets on the fly.
Mitmproxy features
Here is a brief overview of some of the features mitmproxy has to offer. You can check out the full feature set from the docs here.
Anticache
Summary
The anticache option allows one to set a boolean that removes the if-none-match and if-modified-since headers. During normal HTTP/S exchanges, these headers might elicit a 304 Not Modified response. This response tells the requester that the resource you’ve requested has not been updated since the last time you accessed it. Setting this option is useful if you want to make sure you capture a full HTTP exchange.
Blocklist
Summary
The block_list option uses patterns that allow you to block specific websites or requests. You can instruct mitmproxy to return an HTTP status code or no response. A typical block_list pattern uses mitmproxies filter expression to construct patterns.
Syntax
/flow-filter/status-codeflow-filter
A mitmproxy filter expression that decribes the request.
status-code
The HTTP status returned by mitmproxy.
Example
:~d google-analytics.com:404
This example allows us to block all requests to google-analytics.com and return a 404 status code.
Client-Side Replay
Often used in conjunction with the anticache feature, this feature plays back a previously saved HTTP conversation.
Map Local
Summary
The map_local option allows you to redirect requests transparently to local files or directories.
Syntax
|url-regex|local-path
|flow-filter|url-regex|local-path
local-path
The file or directory to serve the client.
url-regex
A regex pattern matching the request URL.
flow-filter
An optional mitmproxy filter expression that allows for more granular control of the request.
Example
|~m GET|example.com/static|~/static
In this example we map requests to example.com/static to the local directory ~/static/ for all GET requests.
Map Remote
Summary
The map_remote option allows you to define replacements within HTTP request URLs before the are sent to a server.
Syntax
|flow-filter|url-regex|replacement
|url-regex|replacement
flow-filter
An optional mitmproxy filter expression that allows you to define which requests are mapped.
url-regex
The regex pattern that defines what gets replaced.
replacement
The substitution string.
The map_remote allows you to specify replacements within HTTP request URLs. These replacements are requested instead of the original resources.
Example
|.*\.jpg$|https://placedog.net/640/480?random
In this example we map all requests ending in .jpg to https://placedog.net/640/480?random.
Modify Body
Summary
The modify_body option allows you to define replacements within bodies or flows.
Syntax
/flow-filter/body-regex/replacement
/flow-filter/body-regex/@file-path
/body-regex/replacement
/body-regex/@file-path
flow-filter
An optional mitmproxy filter expression that allows you to define which flows a replacement applies to.
body-regex
A regex pattern that defines what gets replaced.
replacement
A string literal that is substituted in. You can use @file-path which is treated as a file path to read in the replacement.
Example
mitmdump --modify-body :~q:foo:@~/xss-exploit
In this example we are replacing foo with data read from ~/xss-exploit.
Modify Headers
Summary
The modify_headers option lets you specify headers to be modified.
Syntax
/flow-filter/name/value
/flow-filter/name/@file-path
/name/value
/name/@file-path
flow-filter
An optional mitmproxy filter expression that allows you to define in which flows to modify headers.
name
The name of the header to be set, replaced, or removed.
value
The header value to be set or replaced. You can use @ as in @file-path which is treated as a file path which the value is read from.
Example
/~q/User-Agent/@~/useragent.txt
In this example we are setting the User-Agent header from ~/useragent.txt on all requests.
Proxy Authentication
The proxyauth option asks the user for authentication before they are permitted to use the proxy.
Server-side Replay
The server_replay option lets you replay server responses from saved HTTP conversations.
Sticky Auth
The stickyauth option is similar to the sticky cookie option. HTTP Authorization headers are replayed to the server once they have been seen.
Sticky Cookies
The stickycookie option will add the most recently set cookie to all cookie-less requests.
When used in conjunction with client replay you can record the authentication process and simply replay it on start when you need to access secured resources.
Streaming
When streaming is enabled message bodies are not buffered and are sent directly to the client/server.
Installing Mitmproxy
The installation of mitmproxy is straightforward depending on your OS. I’m on macOS so I’m using Homebrew.
macOS
Utilizing Homebrew run the following in your terminal.
brew install mitmproxy
mitmproxy --version

Verifying that mitmproxy is installed on our host.
Wireshark
Wireshark is a free and open-source packet analyzer that can be used to analyze network traffic. This tool is useful in that you can utilize it to troubleshoot network issues as well as a security tool by analyzing interactions between servers.
Installing Wireshark
You can install Wireshark by visiting the Wireshark download page.
Verifying Wireshark
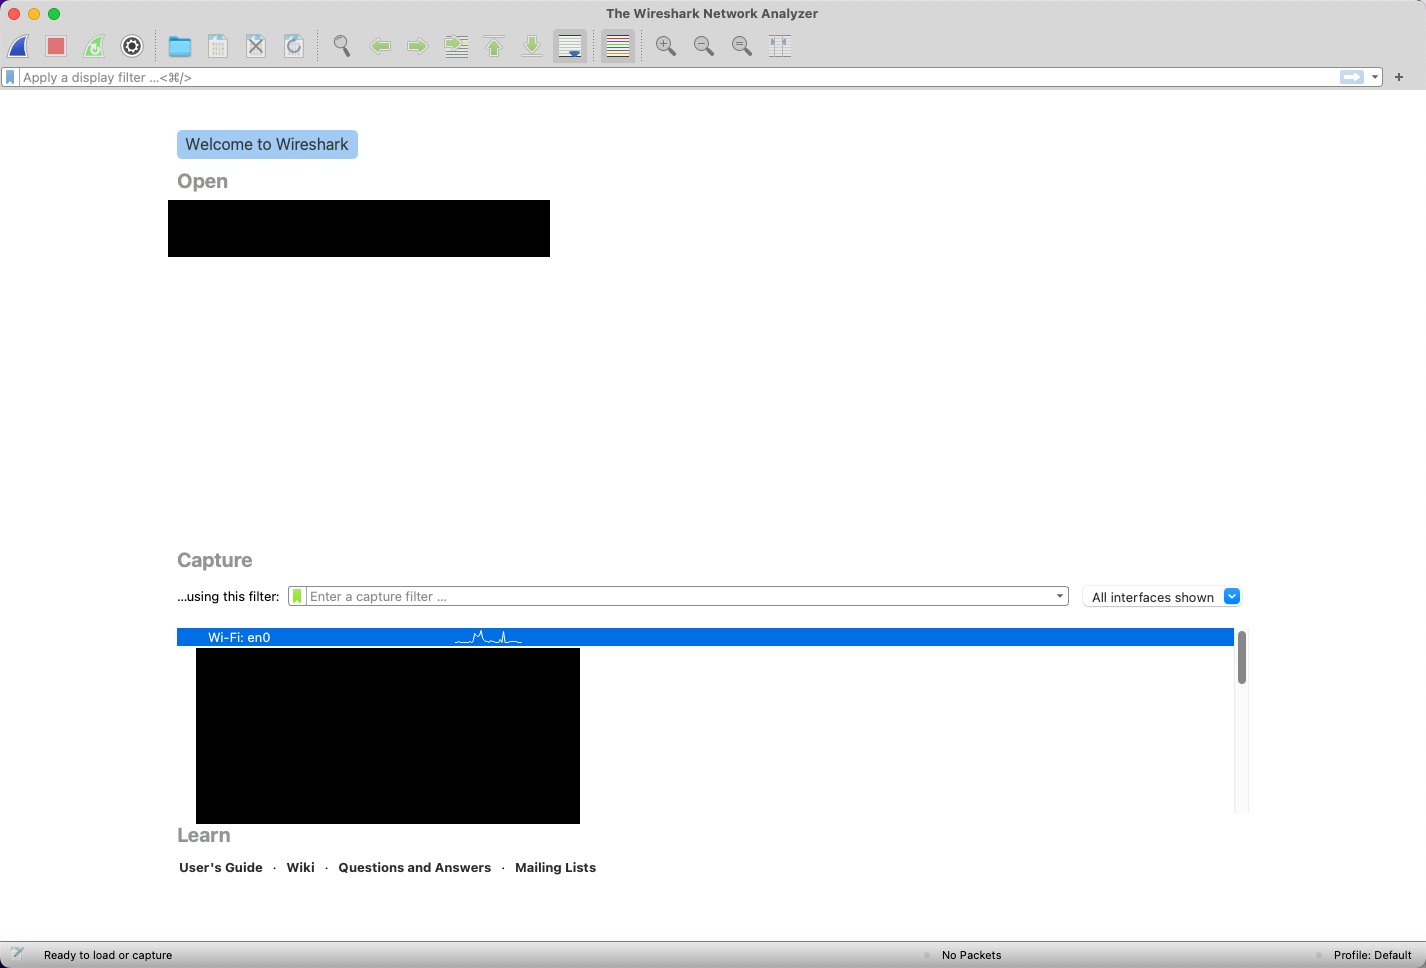
Simply open the Wireshark application, you should see a list of interfaces.

This screen shows us the available network interfaces wireshark can sniff on.
Encrypted Traffic & the Web
These days a majority of web traffic is running over the HTTPS protocol which is TLS/SSL encrypted. This is good as it disallows the bad guys from potentially reading sensitive data allowing you to safely interact with the web.

We can verify encryption by listening to our main network interface with Wireshark and browsing an HTTPS website. In this photo, I’ve singled out a stream where I was browsing an AWS service. We know it’s over HTTPS since the webserver port is 443 (the default for HTTPS traffic). Notice the text on the right-hand side? It’s not legible which is a product of encryption this ensures the confidentiality of your data.
But what do we do if we want to analyze this traffic? This is where a TLS/SSL-capable proxy comes in handy.
Configuring Network Settings To Use mitmproxy
We will be using mitmproxy as our decryption proxy. For us to pass traffic to it, we need to configure our network settings by adding it as the proxy.
By default mitmproxy uses port 8080 as it’s default proxy port. You can also specify a custom port when using the mitmproxy client with --listen-port <PORT #>
macOS
1. Go to System Preferences and select Network.

2. Select your network interface and then select Advanced.

3. Select Web Proxy (HTTP) and Secure Web Proxy (HTTPS). Under each add 127.0.0.1 as the Secure Web Proxy Server and 8080 as the port.
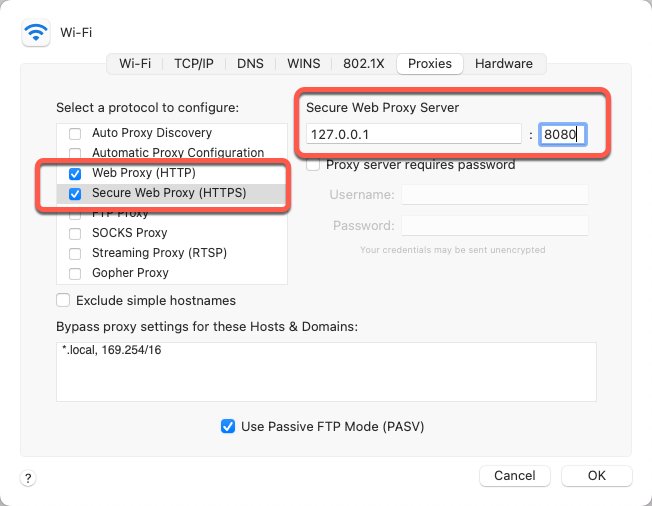
4. Select OK and save the network configuration.
Windows
1. Open the Settings Pane

2. Open Network & Internet

3. Select Proxy
4. Scroll down to Manual Proxy Setup and add 127.0.0.1 as the proxy address and 8080 as the port. Make sure Use a proxy server is on.

5. Click Save
Verifying Traffic is Passing Through mitmproxy
Navigate to http://mitm.it in order to ensure your web traffic is passing through mitmproxy.

Traffic IS NOT passing through mitmproxy.
If our traffic is not passing through mitmproxy we get a lovely message when navigating to http://mitm.it that we are not passing through our proxy.

Traffic IS passing through mitmproxy.
If we added mitmproxy correctly in our network settings we should see the message Install mitmproxy’s Certificate Authority. We can also verify the flow through the mitmproxy command-line client. Here I am running mitmproxy through PowerShell.
Install mitmproxy's Certificate Authority
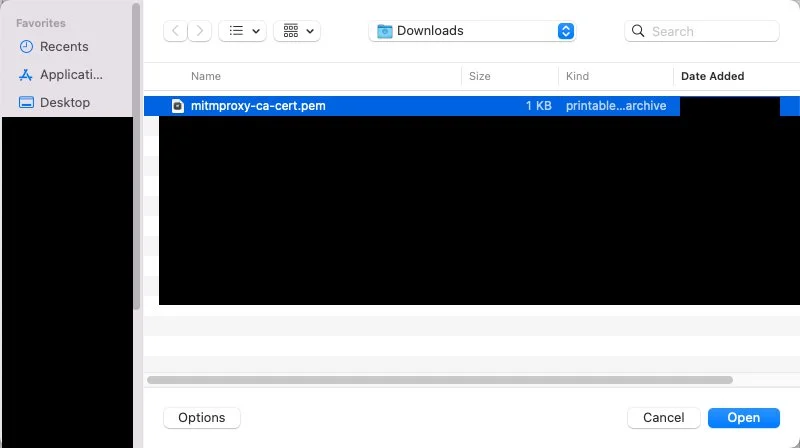
After you are successfully passing your web traffic to mitmproxy you need to install mitmproxy’s certificate authority. This allows mitmproxy to decrypt the traffic.
macOS
1. Under Install mitmproxy's Certificate Authority click Get mitmproxy-ca-cert.pem

2. Using Finder navigate to the Downloads directory and then double click mitmproxy-ca-cert.pem.

3. You may need to enter your password in order to use the Keychain Access utility.
4. Under Keychain Access select File > Import Items and point to mitmproxy-ca-cert.pem.

5. To make changes to the keychain you will once again be asked to enter your password. After which your key should be successfully imported.
6. Double click the newly imported mitmproxy key.

7. Under Trust select Always Trust. Close the window and then re-enter your password.

8. Once you’ve entered your password you should see blue/white plus next to the mitmproxy cert.
Windows
1. Under Install mitmproxy's Certificate Authority click Get mitmproxy-ca-cert.p12

2. Navigate to your Downloads folder in explorer and double click Get mitmproxy-ca-cert.p12 which will bring up the Certificate Wizard.

3. Run through the Certificate Import Process

Store Location should be Current User
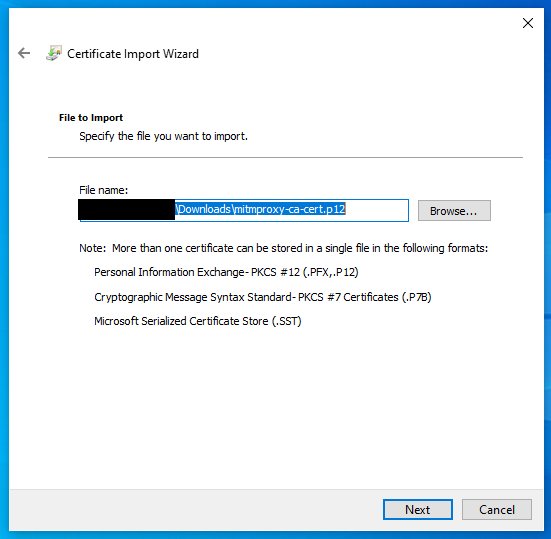
Be sure that the File name is pointed to the location of our certificate
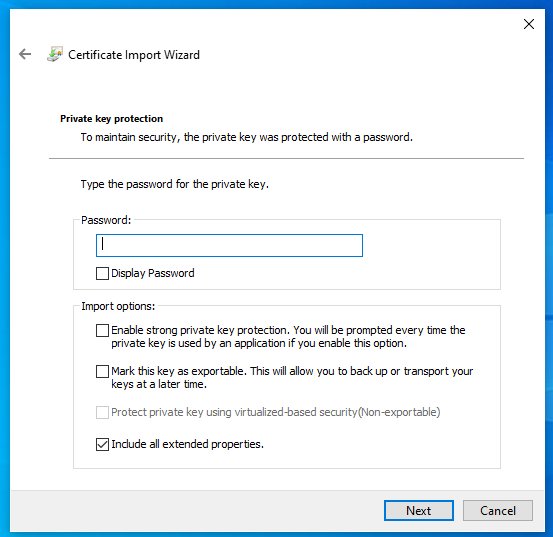
Leave the defaults with no password for Private key protection

Keep the default option on the Certificate Store

Verify the File Name is pointed to your key and Content is PFX. If not PFX you downloaded the wrong key from http://mitm.it. If all is well click Finish.

You should be notified that the import was successful after you click finish.
Verify mitmproxy is Decrypting Flows
After we have successfully imported our private key we can run mitmproxy. I’m using the mitmproxy.exe inside of Windows PowerShell -for this example but the command for macOS/Linux is simply mitmproxy.
1. In a privileged terminal run the following:

2. You may need to give permissions to mitmproxy, click allow.
3. Navigate to an HTTPS website, you should then see a list of flows populate in your terminal. These flows are all passing through our proxy.
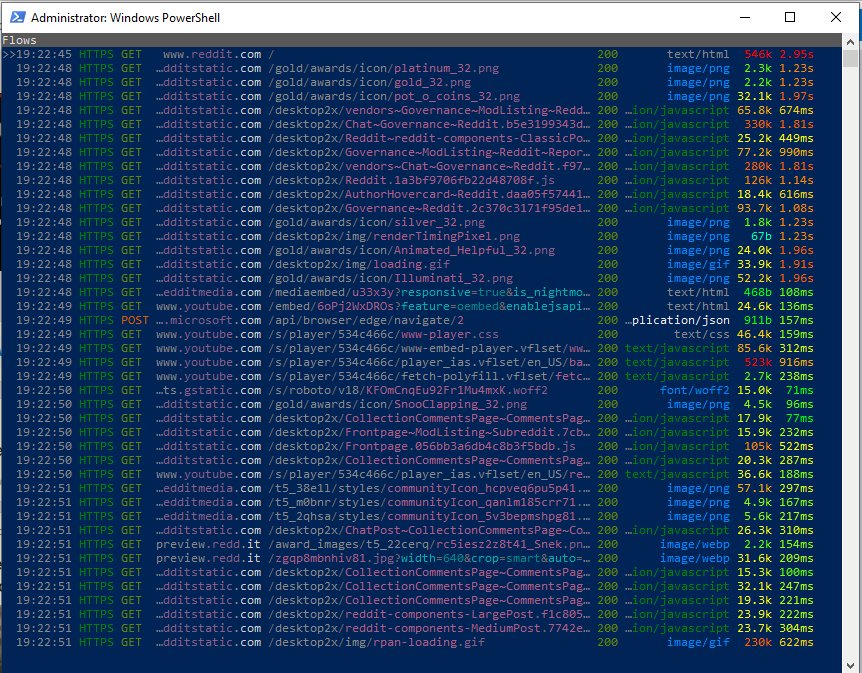
A list of flows intercepted by mitmproxy
4. Select one of the HTTPS flows. You should be able to see the plaintext of the packet.

Sample decrypted flow, plaintext is redacted.
Setting Up Wireshark for Decryption
Setting Up The SSLKEYLOGFILE
In order for Wireshark to decrypt HTTPS sessions it needs to be able to read the SSLKEYLOGFILE file. This file is a log of the values used by your web browser to generate TLS session keys.
Windows
In a terminal run the following inside of the .mitmproxy directory which is installed by default inside your home directory. This command sets the SSLKEYLOGFILE variable which we will use to write our session keys to.
$env:SSLKEYLOGFILE="~/.mitmproxy/sslkeylogfile.txt"
mitmproxy.exe
macOS
Similar to the Windows example but with standard UNIX syntax. In a terminal run the following inside of the .mitmproxy which is installed by default inside your home directory. This command sets the SSLKEYLOGFILE variable which we will use to write our session keys to.
SSLKEYLOGFILE="~/.mitmproxy/sslkeylogfile.txt" mitmproxy
Editing Wireshark TLS Settings
Now that we have the SSLKEYLOGFILE set to log session keys we can have Wireshark read this file in order to decrypt the traffic.
1. Open Wireshark
2. Go to Edit > Preferences

3. In the Preferences menu select Protocols and scroll down to TLS.

4. Select TLS and point the Pre-Master-Secret log filename to your sslkeylogfile.txt
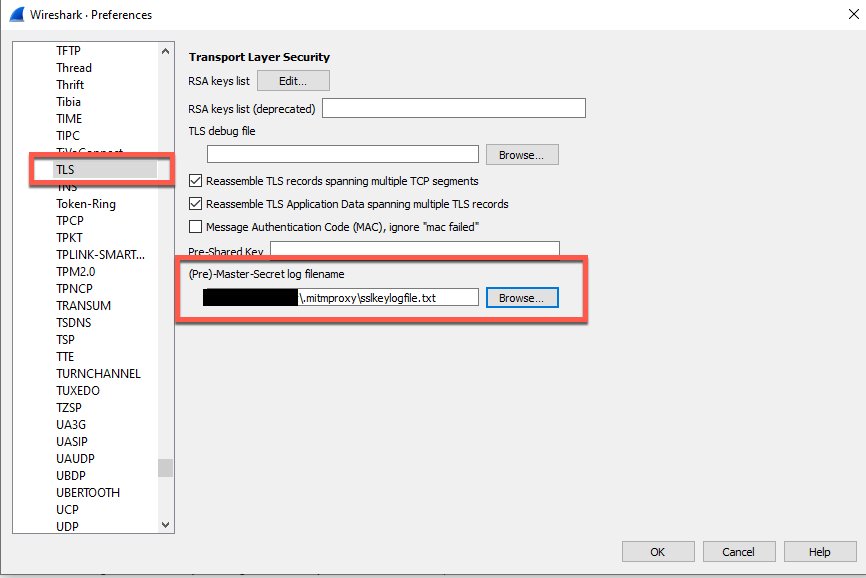
5. Select Ok and exit the preferences menu.
Decrypting Web Traffic With Wireshark
Once Wireshark is pointed to our SSLKEYLOGFILE we can open wireshark on the interface where our mitmproxy is configured.
1. Open Wireshark and select interface.
2. Generate some HTTPS traffic by browsing HTTPS websites.
3. Select an HTTPS stream, you can filter for HTTPS by adding tcp.port==443 as a display filter.

4. Right-click on a packet and follow HTTP, if this option is available it shows we have successfully decrypted this HTTPS traffic. If not then we are not decrypting traffic.
On the bottom left you should also see a pane named Decrypted TLS which indicates that Wireshark has successfully decrypted this traffic with our SSLKEYLOGFILE. Clicking this pane will reveal it’s plaintext. Furthermore, a Follow HTTP Stream will pop up with our plaintext body.

In this example we have decrypted an AWS request. Win!
Conclusion
Mitmproxy is a powerful transparent proxy that allows us to decrypt and manipulate encrypted web traffic. When utilized with Wireshark we are able to decrypt a plethora of web traffic for analysis and research.
I hope you have found this guide useful. Be sure to let me know in the comments below if you encounter any issues. How will you use SSL/TLS encryption?