Expressjs: Organizing Routes and Routing for an API
In this tutorial, I will demonstrate how to create a simple project structure and the usage of Express.js (a minimalist web framework) routing, including the usage of the express.Router class object to build a simple API with. When developing Node.js applications, organizing your code in a modular and readable fashion is crucial. Well-organized code helps make web applications more efficient, making them easier to troubleshoot and test and giving you more time to develop user-friendly applications.
1. Initialize a New Project with npm init
To get started, we will create a new directory, change into this directory with the change directory command (cd) and run npm init to get started on a new Node.js package.
mkdir ExpressJS-Organized-Routes-Demo

cd ExpressJS-Organized-Routes-Demo

npm init
Once npm init is executed, it will ask us questions about the metadata we want to include in our package.json file. We can use the defaults for each by pressing enter on each prompt. Upon completion, we will have a new package.json file in the root of our project directory.
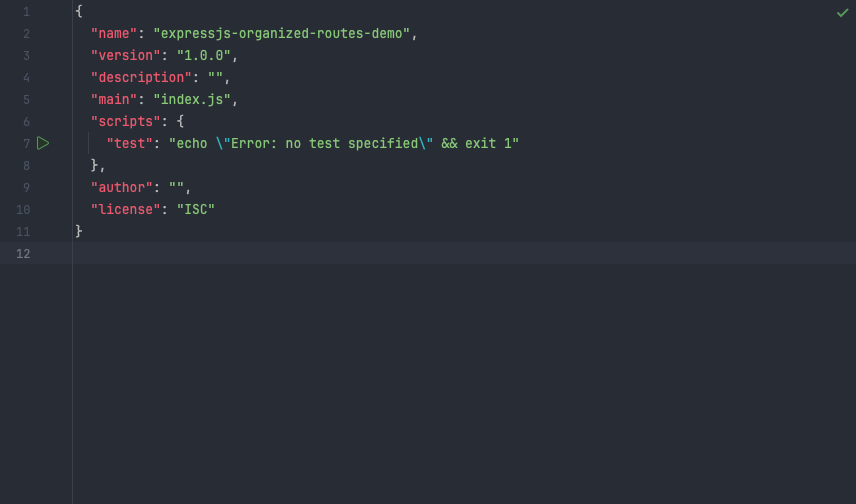
Figure 1 - The result of running npm init is a new package.json file
Once we've verified our package.json was created, we can install the express.js nom package to start using Express's routing capabilities. To install the Express.js NPM package, run the following command from your project terminal.
npm install express
We can verify the installation of Express.js by checking our projects package.json file, which lists dependencies (or package installs) that our project uses.
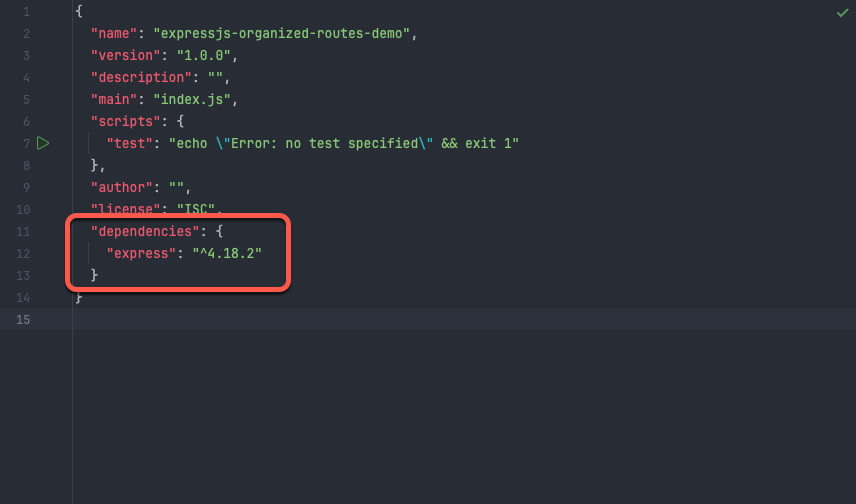
Figure 2 - The result of running npm install express is adding express as a project dependency
Once we've verified the installation of Express.js we can move on to creating the folder structure for our Express routes.
2. Creating the Folder Structure for our Routes
To create the directory structure, we will use for this Express API project, we will run the make directory command (mkdir) with the -p flag to create a nested directory structure. I will use the following command at the root of our Node.js project to create the nested folder structure for our Express.js routes project.
mkdir -p src/routes/api/v1
After we run this command we will see a nested directory in the root of our Node project.

Figure 3 - The nested directory structure for our Express routes
Finally, we will create an app.js file at the root of our project folder and a routes.js file inside our v1/ folder. Our project folder will look like the following image.
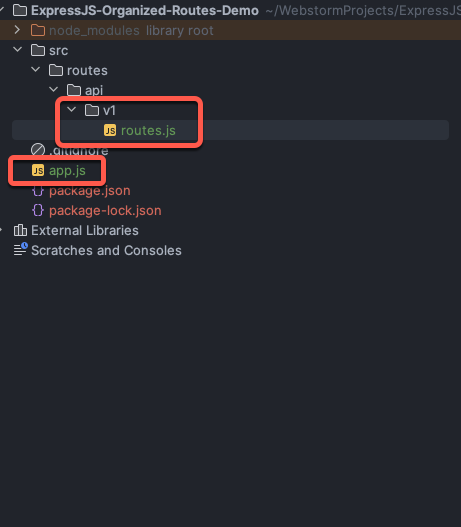
Figure 4 - We create the routes.js file and app.js file
The routes.js file will contain our express.Router object we will mount these routes to the app.js file. This way, we will keep our app.js file clean for the business logic of serving our API. After we create our app.js file, we will define our API router.
3. Defining our Express Router
Inside our v1/ directory, we will create a routes.js file. Within this file, we can define an express.Router() object, which will help us build modular routes within our Node application.
What is the express.Router class?
Within Express.js, the express.Router class is a middleware object that allows developers to create modular, mountable route handlers. We will attach a path inside our main app.js file to access the router from the main app.
Creating our express.Router and route
Inside the v1/ directory, we will create a file called routes.js. In this file, we will set up a simple Express router (api) with a single GET route "/info" that responds with a JSON object indicating the server's status as "Running" when accessed. This router will then be mounted in the main Express application to ensure modular express routes.
Import Express Module
This line imports the Express.js module, which is a web application framework for Node.js.
const express = require('express');
Create an Express Router
Here, a router object is created using express.Router(). Routers in Express are used to create modular, mountable route handlers.
let api = express.Router();
Define a GET Route
This code defines a GET route for the path "/info" on the api router. A callback function is executed when a client makes a GET request to this endpoint. In this case, it creates a simple JSON object status with a key "Status" set to "Running" and sends it as the response using res.send(status).
api.get("/info", (req, res) => {
    const status = {
        "Status": "Running"
    };
    res.send(status);
});
Export the Router
Finally, the api router is exported to be used in other parts of the application.
module.exports = api;
Our Final routes.js File
After we add these commands, our routes.js file should look similar to the following.
// routes.js
const express = require('express');
let api = express.Router();

api.use(function (req, res, next) {
    res._json = res.json;
    res.json = function json(obj) {
        obj.apiVersion = 1;
        res._json(obj);
    };
    next();
});
api.get("/info", (req, res) => {
    const status = {
      "Status": "Running"
    };

    res.send(status);
});

module.exports = api;
4. Mounting our Router in app.js
Once we have our router object defined along with a route, we can mount this router in our applications app.js file. This will expose our API router middleware to our application and give us a working example of modular routing using Express.
Importing the required modules
We will import the Express.js framework into our application, making it available.
const express = require('express');
Creating an Express application instance
In this line, we will create an instance of the Express application, which is used to configure and define the behavior of our application.
const app = express();
Setting the Application port number
In this line, we will set the PORT variable to either the value of the environment variable process.env.PORT or the default port to 3000 if the environment variable is not defined. This allows the application to be flexible in terms of port configuration.
const PORT = process.env.PORT || 3000;
Adding Router middleware to the application
This line adds the router middleware to our Express application. Middleware functions are functions that have access to the request object (req), the response object (res), and the next function in the application's request-response cycle. In this case, it's using the app.use method to apply the middleware for any routes starting with "/api/v1". The implementation of the routes is the logic we added our router module.
app.use("/api/v1", require("./src/routes/api/v1/routes"));
Starting our Application and listening on the specified port
Finally, we will start our application by calling the app.listen method, specifying the port number to listen on (PORT). When the application starts, we will log a message to the console indicating that the server is listening on the specified port.
app.listen(PORT, (testing) => {
    console.log("Server Listening on PORT:", PORT);
});
Our Final app.js File
Once we’ve added all the code together inside our app.js file we are left with the following logic.
// app.js
const express = require('express')
const app = express()
const PORT = process.env.PORT || 3000;

app.use(express.json());
app.use("/api/v1", require("./src/api/v1/routes"));

app.listen(PORT, () => {
    console.log("Server Listening on PORT:", PORT);
});
Testing Our ExpressJS Routes
We can test our route by first issuing the following command.
node app.js
This command will start our node application and initiate our API to listen on port 3000. After which, we can run the curl or wget command to test our routes.
curl http://127.0.0.1:3000/api/v1/info
If successful, we should see the following JSON object to illustrate that our API functions as intended.
{"Status":"Running"}
Conclusion
This tutorial provides a comprehensive guide on organizing and structuring routes in an Express.js API. It begins with the initialization of a new project and the installation of the Express.js package. The tutorial emphasizes the importance of well-organized code for efficient web application development. It navigates through creating a nested folder structure, defining an Express router, and implementing a modular route with a practical example. The tutorial concludes with the seamless integration of the router middleware into the main application, showcasing a clear and scalable approach to building and managing Express.js routes in Node.js projects. By following these steps, developers can enhance code readability, maintainability, and overall application performance.
If you’d like to have a copy of this project feel free to pull the code from this project from GitHub.