Git Tools - Including a Git Repo Into Another Repo Using Git Submodules
Git submodules are a powerful feature that allows you to include one repository inside another, making it easier to manage and organize your code. This feature can be particularly helpful if you want to add an existing GitHub project to your project but don't want to git clone its entire repository into your project.
Cloning a repository into your project can cause problems with git push and git fetch, making tracking and managing your code more complicated. However, using Git submodules, you can maintain a separate, version-controlled repository within your primary project structure. This means you can include a library or framework in your project stored in a separate repository without copying and pasting files manually or deleting existing .git information.
Git submodules allow you to easily keep your library or framework up-to-date with the latest changes from the original repository without worrying about manually merging code. The submodule is linked to the original repository, so any changes made to the submodule will be reflected in the original repository and vice versa.
In this tutorial, we will walk you through the process of adding a submodule to your project, updating it as needed, and managing any issues that may arise. We will be using GitHub repositories as an example, but the same principles apply to other Git hosting services such as GitLab.
In this tutorial, we will do the following:
Setup a demo GitHub repository to clone submodules to
Add a submodule to our repository using the git add submodule command
First, let's go through the process of setting up a repository on GitHub, which will be our main repository. This is the repository we want to add submodules to.
Create a Demo Repository on GitHub
First, go to the repository panel on GitHub and select New. This will bootstrap the creation of a new GitHub repository.

Figure 1 - Select New Repository from the Repositories View on GitHub
In my example, I chose to give my new repository the name submodules-root to distinguish that this repository will be the root repository where I will add other GitHub repositories as submodules. After I am satisfied with the name I've given my fresh repository, I will hit the Create Repository button.
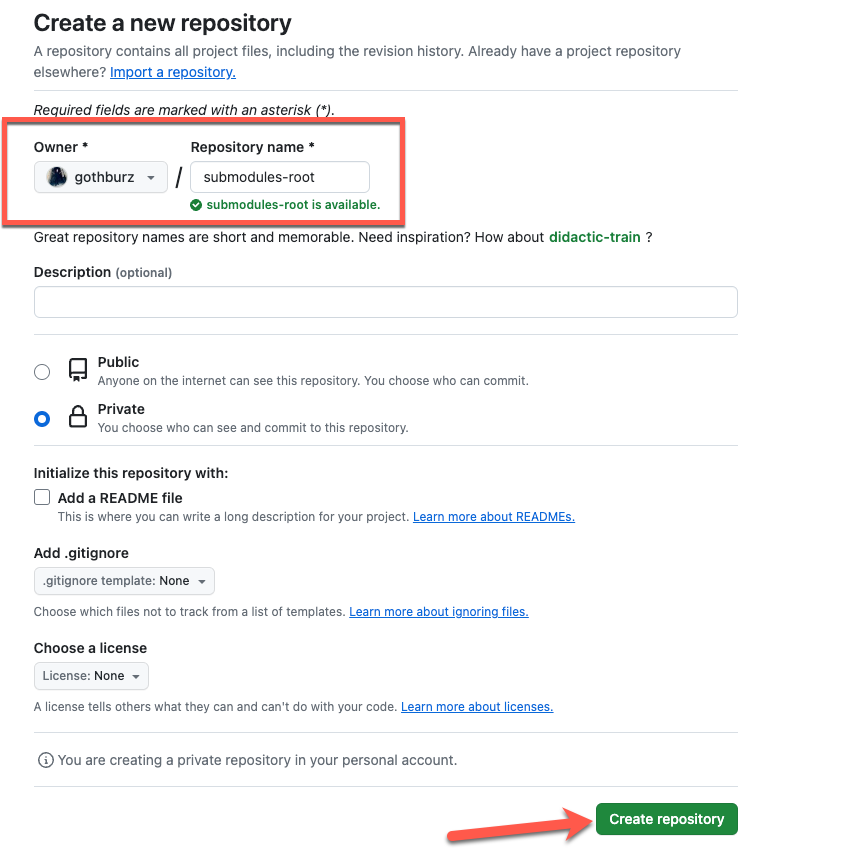
Figure 2 - GitHub Create a New Repository
You will see an empty repository on the web view of GitHub with the following screen.
Figure 3 - Empty repository view on GitHub
Once we've created our root repository, we can move to our local machine to create a sample README.md, git commit this file, and finally, git push this file to the GitHub repo we just created.
Next, we will do the following:
mkdir submodules-root
cd submodules-root/
Once we are in our submodules-root directory run the following commands to create a new repository from the command-line and add a simple README.md file which will be pushed to GitHub.
echo "# submodules-root" >> README.md

git init

git add README.md

git commit -m "first commit"

git branch -M main

git remote add origin git@github.com:/submodules-root.git

git push -u origin main
Let's break down the above commands to further understand what we are doing.
Using the above sequence of commands, we are initializing a new Git repository and pushing it to GitHub.
First, we create a README.md file with the initial content "# submodules-root" using the command-line echo command.
Next, we initialize a Git repository in the current directory with git init command. After that, we add the README.md file to the staging area with git add and commit it with a "first commit" message using git the commit -m command. The branch is then renamed to 'main' with git branch -M main. To establish a connection with a remote repository on GitHub, we use git remote add origin with the repository's URL.
Finally, we push the local 'main' branch to the remote repository on GitHub using git push -u origin main, setting up tracking for future pushes. This sequence sets the foundation for using Git version control on our project.

Figure 4 - Our GitHub repo after pushing our README.md file
Once the above sequence of Git commands has been executed, we should see the new README.md file in our GitHub repository. Next, we can move on to add a submodule to our repository with the git add submodule command.
Add submodules with git submodule add
To demo the git add submodule command, we will git clone the Git source code repository as a submodule into our root project repository.
In order to add a submodule to our repo, run the following commands:
git submodule add https://github.com/git/git.git

git commit -m "added git.git as a submodule"

git push
In these commands, we are integrating a Git submodule into our project. Utilizing the git submodule add command, we establish a link to an external repository, specifically the official Git source code repository, incorporating it as a submodule within our existing project.
Using Git submodules enables us to maintain a separate, version-controlled repository within our primary project structure. Subsequently, with the git commit -m command, we document the addition of the submodule, providing a commit message such as "added git.git as a submodule" to denote our addition of a submodule.
Finally, we synchronized our changes to our upstream GitHub repository with the "git push" command. This transmits these changes to the remote repository and makes the submodule association accessible. This approach not only enhances the organization of our project but also streamlines collaboration by effectively managing dependencies through the implementation of submodules.

Figure 5 - Git submodule as seen after pushing to GitHub
The .gitmodules File
When we add a Git submodule to our project, a .gitmodules file is created for us, a configuration file that stores mappings between the path and the URL of the added submodule Git repo.

Figure 6 - Contents of .gitmodules file
Every subsequent submodule that we add will be added to the .gitmodules file. This informs others who may be working on our project where our submodules originate from, providing a useful tracking feature as our Git project grows in scope.
Conclusion
Git submodules are a powerful tool for managing and organizing code within a project. They allow developers to incorporate external projects into their own without clone entire repositories, thereby helping avoid complications associated with git push and git fetch. Submodules enable the creation of a separate, version-controlled repository within the primary project structure, which can include external libraries or frameworks without manually copying files or disrupting existing .git information.
What's more, submodules are dynamic, facilitating seamless synchronization with the latest changes from the original repository. This ensures that any modifications made in the submodule are reflected in the original repository and vice versa.
This tutorial provided a comprehensive guide for adding, updating, and managing submodules within a project. It uses examples from GitHub repositories and highlights that the principles are universally applicable across various Git hosting services such as GitLab. Following this tutorial, developers can learn how to use submodules to enhance their code management and organization, making it more efficient and streamlined.
I hope you found this post helpful in your own journey using Git, Happy Coding! :)